-->

Sunday, June 28, 2009

weekend home style: swedish summerhouse


I love the whitewashing, blues and reds. A perfect summery home.

Saturday, June 27, 2009

lisa

Lisa Hannigan - Lille from ATO Records on Vimeo.

coconut


Jason Schwartzman's band, Coconut Records

turned out

I'm really liking this street style site I've newly discovered, Turned Out.
I've been browsing the archives, though some of my favorites below will have to wait till autumn rolls around again...


Friday, June 26, 2009

moss green


I would really like to wear more clothing in this moss green color. It's one of the colors (that and blue) that really bring out my eyes and compliment my skin. I've been pretty much only getting new things in blue over the past 6 months, so I now will make a vow to change any future clothing choices to this green.


Wednesday, June 24, 2009

headboard

I just saw this post on Design*Sponge and wanted to share it. As soon as I have a real place of my own I'd love to try this. I even like how the lines of the 'wrought-iron' are a bit squiggly.


Embroidered Headboard DIY

Materials:

– Upholstered headboard kit, like this one from Horchow or build your own.

– Sturdy cotton fabric. If you pick a weave without a lot of “give,” it will help prevent stretching. If you use a linen or thin cotton, it’s easy to reinforce it with iron-on interfacing, which you can get at any fabric store.

–Butcher paper

–Tape measure

–Tracing wheel and tracing paper

–Yarn darning needle

– Wool yarn

–Large embroidery hoop

–Staple gun and staples

Directions:

1. Follow kit instructions to create a padded headboard.

2. Tape together butcher paper to duplicate the shape of the headboard.

3. Draw your design on the paper. A tape measure is helpful for getting the general proportions right. Don’t worry too much about getting the design absolutely precise, since the charm of handiwork lies in the slight imperfections.

4. Pin your fabric to the headboard. Mark center and corners so that you have the fabric aligned correctly when you put it back on after stitching the design.

5. Pin pattern to headboard, and transfer design using tracing wheel and tracing paper.

6. Stitch your design, using a yarn darning needle and wool. Use an embroidery hoop to keep fabric taut. The chain stitch is a fun, fast way to create curvy lines and can also be used to fill out solid blocks: click here

7. Wash fabric, then iron. Reinforce with interfacing if necessary.

8. Stretch fabric over headboard and staple gun to the frame, starting from top center, then bottom center, then the sides.

9. Attach headboard to bed frame.

Tuesday, June 23, 2009

3d design

I got an email from anthropologie today about their '3d delights'.


Gives me lots of good ideas for sewing projects...
now only to get my sewing machine across the sea...


tuesday inspiration: scarlett johansson take 2


because she can somehow look like a sexy, casual, girl-next-door, fairy, ballerina princess all at the same time...

(photo from the first time she was seen wearing her engagement ring from ryan reynolds)

Wednesday, June 17, 2009

buttery brioche

we made this brioche about a month ago. It was the most buttery and delicious. And we did share the loaves.


The recipe actually required a whole block of butter.

Tuesday, June 16, 2009

one room living

I've come to know a lot about one-room-living.

Last year it was one room with a partition to make it feel like two.

This year it's a whole apt, but we live in one room because of the roomies, who watch TV in the main room (sometimes the empty room watches TV too...).

The main problem with one-room-living is there never seems to be enough space, considering you cram what you would put in a whole home into one tiny room. The benefit of that is that you learn to down-size a lot and try not to keep anything around that you do not need.

With that being said, I really don't mind one-room-living, in fact, if the room was on the scale of the one below, I think I would love it. Instead of having a separate kitchen, dining room, living room, family room, it could all be in one big loft space, partitioned inventively with furniture.


Yes, I think I like that room very much.

Sunday, June 14, 2009

Arts & Crafts

Yesterday I went to Liberty's annual Arts and Crafts (1850-1950) selling.

(warning: lots of pictures below!)


The exhibit was beautiful as usual, with lots of Arts & Crafts patterns, carved wooden furniture, woven rugs, tiles, prints, etc.

Art Nouveauish Spring print

I really like the 'T' embroidery in the center, it reminds me of some tile patterns from that era.

Very cool clock

I think their rugs were my favorite part.

And the detailing.

This William Morris couch was great, made from a mahogany frame with William Morris bird fabric, c1890. (POA)

Arts & Crafts reclining chair in mahogany upholstered in linen, c1905 (£2200)

Copper mirror frame.

Close-up of the bird fabric

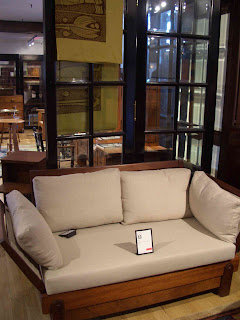
They had one of these couches last year, where the arms can fold down. I really like the simple form of the piece.


Works of Shakespeare

The inlay on this desk was beautiful

I love this carpet

They didn't have many tiles this year, but they did have this beautiful Pilkington set.  If I could find this at a better price (not £1250) one day I will be the happiest girl anywhere.


During the Arts & Crafts period the print ads they used for the Tube and Trains were really artistic.  I took a bunch of photos at the London Transport Museum in Covent Garden of the old posters.  This one at Liberty was an advert for Oxford.

I hope no one would cover this with a cushion.

I loved the upholstery fabric on this chair, and the intricate carving on that side table.
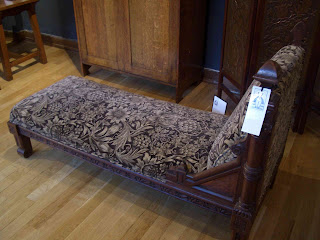
Beautiful chaise

I mainly liked the carving on this wardrobe.


Great prints

This couch looked very comfy.  I like the natural linen cushions and the acorn carvings.

Overall, always a rewarding trip!

Total Pageviews